在以前文章Spring自定义标签实现中,曾说过,在sprin g 配置文件中,除了be an beans import 常用的标签意外,其他的标签都是遵循Spring 自定义标签的扩展机制进行实现功能的,
component-scan标签也不例外,关于component-scan标签的实现逻辑则是在Spring-context 包下 org.springframework.context.config.ContextNamespaceHandler 类中定义
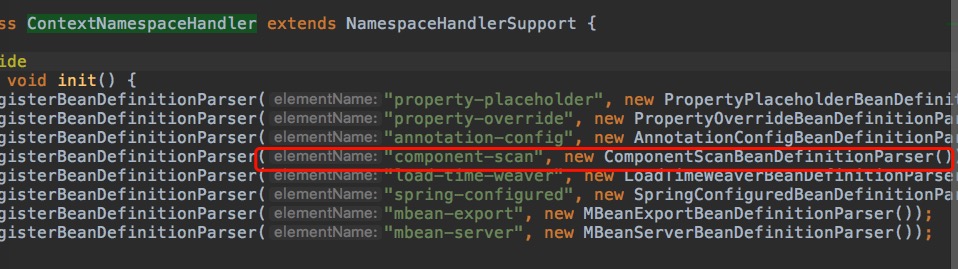
我们看一看它的parse 解析方法:

接下来就分析它的parse 方法:主要就是三步:
1.找到 我们定义的 base-package 属性内容2.定义扫描器3.扫描包内容
第一步是拿到 base-package 属性来确定我们需要扫描的包的路径,不同的包我们可以用,;进行分割 <context:component-scan base-package="com.project" />
String[] basePackages = StringUtils.tokenizeToStringArray(element.getAttribute("base-package"), ",; \t\n"); 第二步 确定 ClassPathBeanDefinitionScanner 扫描器,这个扫描器大有学问
我们点进去 ClassPathBeanDefinitionScanner scanner = this.configureScanner(parserContext, element);
XmlReaderContext readerContext = parserContext.getReaderContext(); boolean useDefaultFilters = true; if (element.hasAttribute("use-default-filters")) { useDefaultFilters = Boolean.valueOf(element.getAttribute("use-default-filters")); } ClassPathBeanDefinitionScanner scanner = this.createScanner(readerContext, useDefaultFilters); 这里就创建了 ClassPathBeanDefinitionScanner对象,并且使用了默认的拦截器 useDefaultFilters,这个拦截器大有作用,我们往下看一些父类方法的调用
return new ClassPathBeanDefinitionScanner(readerContext.getRegistry(), useDefaultFilters);
this(registry, useDefaultFilters, getOrCreateEnvironment(registry));
super(useDefaultFilters, environment);
我们继续,除去一些定义:往下
if (useDefaultFilters) { registerDefaultFilters(); } this.environment = environment; 我们使用了默认的拦截器,这里的 useDefaultFilters 是true ,然后执行 registerDefaultFilters();注册默认的拦截器,我们看一看这个默认的注册方法,很关键
/** * Register the default filter for { @link Component @Component}. * This will implicitly register all annotations that have the * {
@link Component @Component} meta-annotation including the * { @link Repository @Repository}, { @link Service @Service}, and * { @link Controller @Controller} stereotype annotations. * Also supports Java EE 6's {
@link javax.annotation.ManagedBean} and * JSR-330's { @link javax.inject.Named} annotations, if available. * */ @SuppressWarnings("unchecked") protected void registerDefaultFilters() { this.includeFilters.add(new AnnotationTypeFilter(Component.class)); ClassLoader cl = ClassPathScanningCandidateComponentProvider.class.getClassLoader(); try { this.includeFilters.add(new AnnotationTypeFilter( ((Class ) cl.loadClass("javax.annotation.ManagedBean")), false)); logger.debug("JSR-250 'javax.annotation.ManagedBean' found and supported for component scanning"); } catch (ClassNotFoundException ex) { // JSR-250 1.1 API (as included in Java EE 6) not available - simply skip. } try { this.includeFilters.add(new AnnotationTypeFilter( ((Class ) cl.loadClass("javax.inject.Named")), false)); logger.debug("JSR-330 'javax.inject.Named' annotation found and supported for component scanning"); } catch (ClassNotFoundException ex) { // JSR-330 API not available - simply skip. } } 就是上面这段代码,我们姑且先不看代码,先看一看它的注释翻译:
/** * Register the default filter for { @link Component @Component}. * This will implicitly register all annotations that have the * {
@link Component @Component} meta-annotation including the * { @link Repository @Repository}, { @link Service @Service}, and * { @link Controller @Controller} stereotype annotations. * Also supports Java EE 6's {
@link javax.annotation.ManagedBean} and * JSR-330's { @link javax.inject.Named} annotations, if available. * */ 注册一个带有@Component 的默认拦截器,将隐士的注册所有的带有@Component 的元注解,包含@Repository @Service @Controller 注解
通过这个解释,我们可以得知,默认的拦截器会拦截带有@Component 注解的类,我们看一下@Controller @Repository @Service的定义
@Target({ElementType.TYPE})@Retention(RetentionPolicy.RUNTIME)@Documented@Componentpublic @interface Controller { @Target(ElementType.TYPE)@Retention(RetentionPolicy.RUNTIME)@Documentedpublic @interface Component { @Target({ElementType.TYPE})@Retention(RetentionPolicy.RUNTIME)@Documented@Componentpublic @interface Repository { 看一看出来什么呢,这三个注解都实现了@Componet 的注解,所以都会被拦截住;
其实通过它的注释我们就已经明白了,我们就看一下代码逻辑吧,这个 includeFilters 其实是一个链表
private final ListincludeFilters = new LinkedList ();
进行注册Component 拦截器:
this.includeFilters.add(new AnnotationTypeFilter(Component.class));
第三步具体的逻辑大家可以往下点点;我们有了扫描器了,我们其实可以进行第三步扫描了:
SetbeanDefinitions = scanner.doScan(basePackages);
这个方法,扫描到匹配的class文件,装入Set<File>容器里:可以看出获取文件如果是文件目录采用了递归的方式进行下一层寻找
protected void doRetrieveMatchingFiles(String fullPattern, File dir, Setresult) throws IOException { if (logger.isDebugEnabled()) { logger.debug("Searching directory [" + dir.getAbsolutePath() + "] for files matching pattern [" + fullPattern + "]"); } File[] dirContents = dir.listFiles(); if (dirContents == null) { if (logger.isWarnEnabled()) { logger.warn("Could not retrieve contents of directory [" + dir.getAbsolutePath() + "]"); } return; } for (File content : dirContents) { String currPath = StringUtils.replace(content.getAbsolutePath(), File.separator, "/"); if (content.isDirectory() && getPathMatcher().matchStart(fullPattern, currPath + "/")) { if (!content.canRead()) { if (logger.isDebugEnabled()) { logger.debug("Skipping subdirectory [" + dir.getAbsolutePath() + "] because the application is not allowed to read the directory"); } } else { doRetrieveMatchingFiles(fullPattern, content, result); } } if (getPathMatcher().match(fullPattern, currPath)) { result.add(content); } } }
转换成Resource【】数组:
return result.toArray(new Resource[result.size()]);
将每一个resource 封装成 MetadataReader 对象,就可以获取这个class文件的 所有信息,比如是不是接口啊,实现类等信息,这个封装过程需要好好看一下,asm的操作
MetadataReader metadataReader = this.metadataReaderFactory.getMetadataReader(resource);
然后就是拦截器的判断:
isCandidateComponent(metadataReader)
拦截器的过滤匹配
/** * Determine whether the given class does not match any exclude filter * and does match at least one include filter. * @param metadataReader the ASM ClassReader for the class * @return whether the class qualifies as a candidate component */ protected boolean isCandidateComponent(MetadataReader metadataReader) throws IOException { for (TypeFilter tf : this.excludeFilters) { if (tf.match(metadataReader, this.metadataReaderFactory)) { return false; } } for (TypeFilter tf : this.includeFilters) { if (tf.match(metadataReader, this.metadataReaderFactory)) { return isConditionMatch(metadataReader); } } return false; }
if (isCandidateComponent(sbd)) { if (debugEnabled) { logger.debug("Identified candidate component class: " + resource); } candidates.add(sbd); }
通过这个的学习,大家可以去看一下Mybatis 的包扫描了,它则是继承了Spring的扫描类,但并没有使用默认的拦截器,而是配置了自己的一套拦截器及拦截接口等一些配置;